The most important part of carving is having sharp tools and the most important part of sharpening knives and tools is finding a technique that works for you and that you can duplicate every time. The second most important part is practicing your technique over and over until you can duplicate the results every time.
On this page I will describe my procedure for sharpening knives.
The technique that works for me is the tried and true, old fashioned, stones and strop method of sharpening. My father taught it to me 30 years ago when I was a 7-year-old Cub Scout starting on my first pinewood derby car with my first pocketknife. I have used this approach on every knife I have ever sharpened and have always gotten a sharp, lasting edge. I have even used this technique on the carving knives that I make from reciprocating saw blades and they cut and hold an edge as well as any of the knives I have bought.
The stones I use are bench size silicon carbide coarse/medium grit and Hard Arkansas fine grit. My strops are made from pieces of old leather belt glued to a board rough side up. I also carry pocket sized stones in my carving box and tackle box just in case. I do not use lubricant on my stones and wash them after use with dish soap, water and an old toothbrush to remove any clogging. I usually begin sharpening with the medium grit stone unless the blade has been damaged or needs shaping. In that case I use the coarse stone to shape or rework the blade before sharpening it.

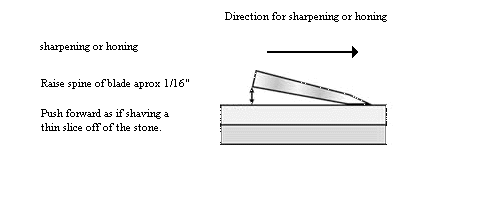
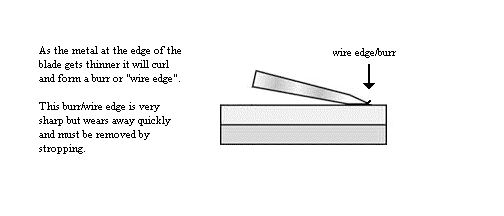
With the dry medium stone I begin setting the edge by laying the blade flat on the stone and then raising the spine about the thickness of a dime. I use long slicing strokes on the stone as though trying to shave a paper-thin slice off of it. I continue this stroke on one side until I get a wire edge beginning to appear along the entire edge of the blade. Then I turn the blade over and use the same stroke on the other side until the wire edge again appears.
Once I have the edge angle I want and have a wire edge along the entire blade length from the medium stone I start on the fine Hard Arkansas stone. Once again I use the stone dry and use long slicing strokes to hone the blade and begin refining the wire edge. During this step I will occasionally check the edge by holding the knife, edge up, over a dark piece of paper under a strong light. If the wire edge is still there it will appear as a shiny line along the edge. This inspection will also show any nicks or distortions along the edge that may need to be reworked on the medium or fine stone.

(Optional) Once I have honed the blade so that there is no evidence of nicks and only a very fine wire edge under the light I switch to a piece of 1500 grit wet and dry sandpaper glued to a board. Holding the blade at the same angle that I used on the stones I pull the blade backward (spine first) along the paper. I usually only take about 10 strokes per side for this step.

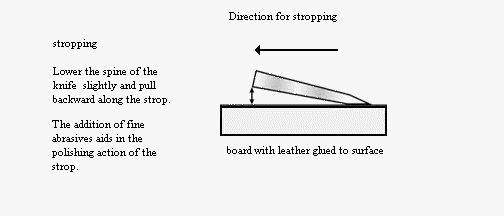
To finish the blade I strop it on a piece of belt leather glued rough side out to a board and loaded with polishing abrasive. There are many types and brands of polishing compounds available, from valve lapping and wheel polishing compounds available at auto parts stores to "custom" compounds sold by carving suppliers. The stroke I use for this is the same as with the sandpaper. I hold the blade at a slightly lower angle for this step as the leather is soft and will roll up behind the blade and can cause the edge to round over. Never lift the spine at the end of the stroke as this will also round the edge and ruin all the work you have done. If you have refined the edge correctly on the fine stone it should only take 5-10 strokes per side to polish the edge to razor sharpness. Again I use the inspection technique listed above to check the edge and strop until the wire edge has completely disappeared. When the abrasive buildup gets black and "gooey" I use a soft brass brush to clean the strop and reapply the abrasive.
Once the blade is honed and polished I carve and cut some scrap wood with it to make sure it will keep the edge. If it sticks or loses the edge I go back to the hard Arkansas stone or strop and work the edge till I get what I want. Once the blade is sharp it usually only takes a quick stropping now and then to keep it sharp unless you are carving very hard wood or using your knife as a utility knife.
A word on stones. New stones have a skin on them that takes time and use to remove and will cut slower and take more strokes to sharpen until this coating is worn off. Over time your stones will begin to develop a dip in the center. This is easily fixed. Find a piece of smooth concrete, sidewalk, garage floor, or old concrete block. Place the stone face down on the concrete and rub lengthwise back and forth with long, even, strokes until the stone is again smooth and flat.
This technique takes time and patience to learn but with practice it will give you a wonderful edge on any knife. With enough practice you will even be able to tell how you are doing by the feel and sound of the blade against the stone.
Good whittlin, Cliff
Glossary Of Terms
Sharpening: Also known as whetting, it is the process of establishing an edge on a tool or blade. Usually done with coarse or medium grit stones (whet stones) or abrasive sheets.
Honing: The use of a fine stone, ceramic, steel, or fine abrasive sheets to refine the edge of a tool or blade.
Wire Edge: As the edge of a blade thins it reaches a point where instead of grinding away it curls away from the stone. This edge is very sharp but wears too quickly to be of any use.
Stropping: The use of a piece of leather, hard rubber, canvas, or smooth board to remove the wire edge and polish the edge to a razor sharpness. The use of fine abrasives speeds this process and helps to achieve a smooth cutting surface.